Localities are geographical areas that can be defined to enable varying freight rates to be applied for a consignment delivered into a specific area.
Adding Localities
To create a locality you first need to navigate to the Organisation Settings menu on the left hand menu bar and select Localities. Click the Add button to create a new locality. Enter a Name, Code and Country for the Locality. Next, choose whether to define your locality as a circular or polygon area. Circles are great if you simply need to define an area of equal distance around an origin while Polygons can help to provide an accurate depiction of town, city or state boundaries.
Define a Circular Locality
To define a circular locality, navigate to the Circle tab then simply left-click on a point on the map, to resize the location click and hold a point on the circle and move it in or out. To move the circle, click and hold the mid-point and drag to another location on the map.
Define a Polygon Locality
To define a polygon locality, navigate to the Polygon tab then simply left-click on a point on the map, continue to click along the perimeter of the locality to define it. To adjust any of the edges simply click and hold the point and move it to a new location.
Editing Localities
Deactivate a Locality
If a locality is no longer needed it can be deactivated. This will set the status of the locality to Inactive, hide it from the map and hide it from the list of available origin and destination and localities when creating a freight rate. Use this option if there is a chance that you may need the locality again in the future. To deactivate a locality click the action menu from within the Locality Detail blade and click Deactivate Locality.
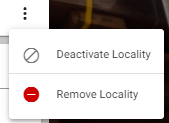
Remove a Locality
Removing a locality will permanently delete the locality from your organisation, if this may be problematic in future consider deactivating the locality instead (as above). To remove a locality click the action menu from within the Locality Detail blade and click Remove Locality.